Bombus Speedshop

Bombus Speedshop
Wrenchin' without supervision since the seventies...

Wednesday, October 30, 2013

Dellorto dynorun

Now I was ready for some serious tuning.
After a while with lots and lots of short test runs I had a Dellorto set-up that looked amazing and with reasonable driveability. The next step was to do the final tuning on the dyno.
The third time around on the dyno for this bike. First: S&S, second: CV and third: Dellorto

On the dyno with the Dellorto, at last

But it took untill autum 2013 before I got to do some dynoruns with the Dellorto.
Because I had to do a cover for the "wire wheel" and solve a problem with a sloppy return spring first and of course solve the dreadful problems that turned out to be the loose valve seat.
So I had to go back to the trusty old CV for a season (2012) to pass technical inspection and to get a proper dynorun on that carb also.
But now the problems are solved and the mighty Dellorto crowns the Shovel again.

But the best news was that the cool Dellorto was even better than the boring, mainstream CV !!


Turquoise -> CV vs Red -> Dellorto

Valve seat

Suddenly the bike was running good just on the front cylinder but poor on the rear when I felt strong enough to try a ride after my stroke.
Step 1A was initiated. Plugs, oil, fuel and pushrod adjustment but it ran still poor on rear cylinder.
Next step was compression test. Not so awesome result, but not bad either.
The action after that was a leakdown test. This time it sounded like it leaked out in the carb.
Aha, something with the intake valve. Rear head went off and so was the intake valve assembly.
Nothing strange here except a small mark in the rocker cover. Could it be the valve spring collar that hooked up against the rocker cover when running and not closing properly? Some light grinding in the rocker cover to get some clearance there followed by thorough cleaning.
Together with the head and new gaskets on to the bike. Time to push the button and darkness spread in my life. Same thing again. So new leakdown, this time it leaked into the exhaust.
Ok, just to start the disassembly again. This time we saw a fraction of a mark in the exhaust side of the rocker cover also.
Grinding a little for better clearance on that side also and thorough cleaning again. But than when we took apart the exhaust valve assembly it all got clear.
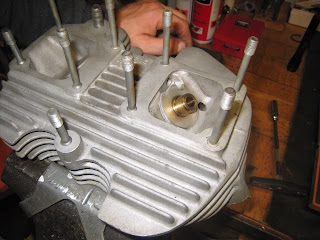
When the exhaust valve slided out the valve seat came with it.
A valve seat should NOT come out by itself. Period ! But this did.

The valve seat when me and Mr Potato disassembled the exhaust valve assembly


No time to waste so back to work again.
A new seat was purchased and milled to size and a appropriate hole for it was made with the Mira valve seat cutter in the head by Potato speedshop.
Me and Mr Potato walked the extra mile one night and soon I had a healthy rear head in my possession to mount on the mighty Shovelhead again back in the mancave.
Rest of the job was kind of routine by now so putting it all together was easy, but timeconsuming.
This time when I pushed the button it sounded like a mighty Shovelhead should.
And so my season could begin in september, but still....
Autum in Sweden 2013 was supernice and I got a little over a month of riding before the rain came for real.
This thing to get some rides was not just a nice thing generally it really boosted my moral and recovery from my stroke and made me a happier man.

And finally the mean bagger got it's health back and could roar for a while even 2013

The sixth winter (12/13)

The sixt winter ended a little different.
March 14 2013 I got a stroke that didn't affected the winter so much as me and my familys life.
Happy to say is that I got some riding done in the autum.
A stroke is often the end of riding for good. Even if my stroke started out pretty bad with no speak and almost paralyzed left side including my left eye I recovered quick after my brain surgery where they removed three clots.
But It ended well (so far) and I'm recovering strong and hopefully I will be back at work in beginning of 2014.

This winter became not so active as I planned. My time in the mancave was mostly filled with coffe and laughter. Not a bad complement to wrenching but the Shovel bagger got a little neglected for sure.
Main jobs was to remount the Dellorto carb again and finally get it running properly. The autum before it ran like a dream with the CV but when I felt stable enough for a bagger ride the mighty Shovelhead sounded a little sick. First I thougt it was the Dellorto causing the problem but I realized soon it was much worse problems involved.

# Valve seat
# Dellorto dynorun

Tuesday, October 29, 2013

Sidebag hinges


Another thing that have been bugging me since day one was the poor way to mount the lids on the sidebags.

In the beginning the lid came off when unlocked, in the front it was just a tab that went in to a hole
and this was a bad idea from the beginning so after 30yrs of rattle it had become even worse.
So I saved the hinges from the Tourpack before I threw it in the bin.
With some tweaks the hinges was mounted and I had a fairly solid solution with a hinge in the front of the bag.
Next step is some of solution for it to stay open when unlocked, but more about that later.

  The Tourpack residues got new life

CV carb again

I had to do a cover for the "wire wheel" and solve a problem with a sloppy return spring on the mighty Dellorto carb so I had to go back to the trusty old CV for a season to pass technical inspection. (every other year here in Sweden)
This was a straight forward job. The CV had been working perfect before so it was just to remount it with all the old hardware, cables and airbox.

Seatpans


Two seatpans was made of fibreglass and epoxy.
This time I made them with the bike as a mould to get low profile and perfect fit.
I made two of them, one for a big comfortable dual seat and one to the sleek but still comfortable “Badland” style seat.
But the final job making seats of them was put to halt and will be done a later year.


I made two of those

The fifth winter (11/12)


This really became a middle year in the life of Swebagger but still some stuff was made...
And even this year the first spring run was made in the middle of the summer.

# Seatpans (again)
# CV carb again (a quick swap back to the CV)
# Sidebag hinges (Tourpack residues)

Windshield


After some sheet plastic hunting i found a piece that was ok, not dark enough to be honest but good enough. I used the old windshield as a template and used a regular jig saw to get the right form.
I had already made a lower windshield of the stock clear one that looked great, so I just had to copy that one to do my darker version.
To mount it I walked an extra mile, two sets with “Bar’ n Shield” licence plate mounting kits was bought.
I used seven of these eight “Bar’ n Shield” bolts to mount the windshield and it looked awesome.

Nice shade

The mounting hardware

Carb tuning


When all the hardware job was done with the Dellorto carb the tuning begun.
After some tips from a English company that sold me parts I was on the road.
I realized quite fast that I needed some help with the basic tuning but the sad part that none had any experience with it. So the only thing was to use books to become familiar with the Dellorto.

This book and Matt at dellorto.co.uk was a enormous help in this adventure

But after hours of reading books something was still missing, so the hunt for a Lambda/AFR meter begun. Quite soon I found a decent one to a great price. 
A Lambda sensor bung was welded in the rear pipe and the gauge was mounted in the fairing instead of the broken clock.


The lambdameter hooked up in the fairing.


And a lambda sensor in the rear pipe

Now I was ready for some serious tuning.
After a while with lots and lots of short test runs I had a Dellorto set-up that looked amazing and with reasonable driveability. The next step was to do the final tuning on the dyno.

On the dyno, at last

But It took untill autum 2013 before I got to do some dynoruns with the Dellorto.
Because I had to do a cover for the "wire wheel" and solve a problem with a sloppy return spring first. So I had to go back to the trusty old CV for a season to pass technical inspection, but now the problems are solved and the mighty Dellorto crowns the Shovel again.

But the best news was that the cool Dellorto was even better than the boring, mainstream CV !!

Turquoise -> CV vs Red -> Dellorto


New carb


One day I saw a picture of a Dellorto DHLA two throat carb mounted on a long intake and I was hooked !!
I soon found an old intake on eBay and when I got it home I started by de-chrome the dodgy chrome and then did some hard time by the polish wheel and eventually it got a new shiny life.

The carb hunt was up next, after a while I found one in a really bad shape that i got for a bargain.
It didn’t matter because I was to rebuild it completely so I went for it.
First stripped it down completely and then some glass blaster before it got all shiny inside bits and fresh gaskets.
Really expensive in the end but when I saw it mounted on the FLT together with the awesome shiny intake and the huge K&N filter with velocity stacks hidden under it was worth every penny I can guarantee.

The new carb adventure started with this mess...

...and ended like this, maybe the most awesome Harley carb setup in the history

And to get all hardware together became the easy part when looking back at this project.
Next step was o get it dialed in properly, not the easiest task I discovered.

The fourth winter (10/11)


The fourth winter was supposed to be a middle year with just some minor tweaks but it didn’t last very long so the first spring run was made in the middle of the summer.

This year these things got my attention
# New carb
# Carb tuning
# Windshield

Luggage rack


The luggage rack had been a horrific part on the bike since day one.
The only problem was that it has to be there if I want to mount the Tour pack.
But after a whole summer without the Tour pack mounted a single time I took the decision to remove the luggage rack for good.
The Tour pack was an awesome way to get the stuff dry and easy to a party but the bike looked awful.
And when the looks of the bike gets better and better for each year the Tour pack and luggage rack had to go.
A drybag will be my packing choice for the future or at least until I figure out a more good looking way to mount the Tour pack.

Some seconds later with the grinder ...


...and the looks went for the better


Shocks


Even I struck gold sometimes it seems.
Had been looking for Öhlins rear shocks since I bought the bike.
I realized that new Öhlins shocks was out of the question, the price tag was way out of my league.
So old cheap ones that I could rebuild to my specs was my target.
But suddenly one day when I did my daily bargain hunt on the net for parts I struck gold.
A pair of Öhlins from a FXR appeared on the screen and with an awesome price.
A quick call and I have got me a set of my dream shocks.
The FXR has basicly the same frame as the FLT, so the mounting was Childs play.
A quick cleanup was the only thing I had to do before I could mount them with the old hardware.

Swedish performance for American iron

Seat


The year before I bought a used seat from England at eBay.
The idea was to take off the "leather" and reshape the foam to something that looked something like a Harley "badlander" seat. I have done this on my previous Harley FXR with very good result,
but this time I had to put in more time, effort and $$ to get some result. The plastic seat pan was way too wide to fit so I had to do a pan in fiberglass from scratch anyway.
The plastic seat pan was cut and redone so it could work as a mould, then I covered it with fiberglass and epoxy.
This pan was then reshaped together with the foam and then re covered with some good looking "leather look" black vinyl.
The result became decent but not perfect, but it was good enough for a while.
Next time I will do a pure custom seat pan with the frame, tank and rear fender as a mould.


The ugly stock seat with driving position way forward to suit my length and taste

New seatpan in the making

The new version, not perfect but good for now.

Handlebar controls


The old ugly and totally worn out controls was replaced by a used set of Harley V-Rod controls.
Clutch side with hydraulic clutch master cylinder to match the Hurst hydraulic clutch cover.
All of it was repainted in satin black powder coating and new gaskets.
And when it all came together it both looked and worked great.


The totally worn out OEM handlebar controls

The new ones, paired to the ISR 6 pot caliper and Hurst hydraulic clutch cover

Clutch


A need for some serious clutch action was another thing high up on the to do list.
Over the years the cluch wire assenbly hade been worn out.
It was so bad that I had to shut of the engine to get it in neutral when standing still.
I first tried the classic choppertrick to remove one clutch disk and one steel plate.
This did't solve the problem with neutral it just gave a slippery clutch.
So I realized something had to be done so I went hydraulic.
A new sturdy billet trap door for a newer 5 speed gearbox was mounted before a HURST hydraulic clutch cover could go on.

The stock worn out and not so pretty clutch release


The new shiny Hurst hydraulic cluth release
paired with the new billet trapdoor behind


Front wheel


Then it was time for my stock 16" cast front wheel to be replaced by a single disc chrome hub from a newer Harley.
Around this I put shiny chrome spokes and finally a 21" x  3,5" Akront/Morad alu rim.
On the left side I mounted an ISR six pot race caliper and a custom made full floating racing 330mm ISR disc.
The ISR caliper I mounted in the existing left leg bracket with a custom billet aluminum adapter plate i made.
Right leg original caliper bracket was shaved of.
And after that both legs got a bright polish before new seals was mounted.
Finally a new nice black Continental ContiRace Attack Custom 120/70- 21 tire was mounted before it all came together.

First cut is the deepest...


Early mockup to see the difference
(Note the not so rigid cardboard brakedisc)


First I made an adjustable caliper bracket template


Than I made a full scale bracket out of 10mm alu...


...and with that bracket as template I made the final bracket
out of a piece of 10mm alu I got from ISR


The shiny alu Morad 21" x 3,5" rim


The awesome threaded Continental ContiRace Attack Custom


And this is how it's turned out. Not so bad I think

The oilproblem

The summer 2009 after the engine overhaul was a little bit of this and a little bit of that.
But the big problem was a serious oil spill when running.
I layed down under the bike sooooo many times during this summer to locate.
The problem was that the amount of oil pouring out and spreading under the bike.
Because of this it was so hard to locate its origin.


The oilproblem when it still was totally out of control
(this much dripp just standing still at idle)

But I saw it came somewere by the oilpump.
So the first thing to wrench was to remove the oilpump again.
I disassembled the pump and took care of the gasket surfaces.
Very fine wet sandpaper on a sheet of thick glass and slowly start even the surfaces.
And it was some areas that didn't was completly flat but nothing extreme.
The pump went back on the bike again together with new quality gaskets.
And than...? Same result.

Under the completly clean underside again and this time I saw something.
The pour came from behind the pump, between the block and the pump.
Of with the pump again.
It is wery tight between the block and pump so it was hard to see when on the ground looking upp.
But finally with the pump on the bench again I saw a plugged hole with bolt and copper gasket and this was lose.
Sooooo good to have found the problem.
Tight that bolt to specs, and back on the bike....finally dry.

The third winter (09/10)


After a summer of hell with a oil leak on the overhauled motor the autumn ended with a fairly dry driveline.
This winter I wanted to give not only mechanical attention to the racebagger but also cosmetic.

On the agenda this winter was
# Oil problem
# Front wheel
# Clutch
# Handlebar controls
# Seat
# Shocks
# Luggage rack

Sunday, October 27, 2013

Side bag brackets

The side bag brackets was in same shabby condition as the lower bag brackets.
I first considered new chrome but I decided it would look better when black.
So they also got black powdercoat and new mounting hardware.

Both the side bag brackets and the small brackets mounted on it got new paint

Lower bag brackets

The lower bag brackets that also doubles as rear exhaust mount had a bad look.
Crome was rusted and was in a general shabby state.
I made small nice nuts that I welded on the backside of the bracket for a cleaner mount.
Than it all got a round of black powdercoat before mounted with new stainless insex buttonhead bolts.

Shiny new black powedercoat instead of the dodgy chrome.


The small nuts I made welded on the backside


Nice stainless buttonhead insex bolts makes a tidy and sturdy connection

Floorboards


The old floorboard was replaced by a complete set of floorboards from a Fat Boy -04 with mounting brackets, gearshifter and brake caliper.
The old boards and some of the old hardware was shaved of and the measurement begun.
The new position became about 4" forward and 1,5" down in the rear.
To mount them I made adapter plates which were mounted in the original brackets and new holes was made to mount the new floorboards.
On the backside of the brackets I welded handy, nice little nuts to make mounting more easy.
The new brackets got a round of black powdercoat before it came on the bike.
And than I mounted it all with new nice looking stainless buttonhead insex bolts

Right side mounted with brackets and new hardware.

Left side got the same treatment and the stock kickstand was used in the old position.
The kickstand worked fine and just needed a thin wedge to give it the right angle.
I also shortend the shift rod arm and made a fancy new linkage out of reinforcing bar that I painted silver and mounted with the stock ends from the  -04 linkage.


Carb and mufflers

To top off the engine rebuild I did an upgrade to the "in and out section" of the bike.
The old S&S carb was replaced by a CV with a alu flange to match the S&S intake.
 CV with aluflange and S&S intake


I found a complete OEM chrome lid with the stock black grill on a local swapmeet.
It had probably been sitting on a shelf for three decades or so because it was all covered in dirt and dust but under this it was a immaculate chromed lid hiding.

The immaculate lid with the grill intact


The lid I paired with a backplate I did from scratch together with a K&N filter from a Twincam that I bought at a swapmeet.
First I made the plate itself to match all neccesary holes, than I cut small pipes and welded to the backplate to get the right spacing for the K&N filter between the backplate and the lid.
I also made some handy nuts that I welded on the backplate to ease up the mounting of the lid.
Finally I welded support brackets to the backplate to mount in the stock mounts in the rockerboxes.
So much measuring to get everything all lined up and a perfect fit, but It became a nice piece in the end.

The CV airfilter backplate


Lid, backplate & K&N


Another modification I did was a remote idle adjuster.
My friends with Mikuni HSR's has a remote idle adjuster that I thought was a handy feature.
Another friend with a Buell S1 had also an external idle adjuster and he had a CV carb so that looked interesting.
Some hunting at eBay and a Buell idle adjuster cable was on the way over the pond to me.
When I got it home I realized that the thread at the Buell CV was larger than on a Harley CV.
But I just cut a smaller thread over the old and than it worked like a charm.

The external idle adjuster from a Buell S1 finally on my CV

And the end part got a pair of Supertrapp mufflers.
The new muffles was shorter than stock ones so I had to weld a extension bit on the stock pipes to get the total length to match up.

Supertrapp mounted in the new powdercoated brackets and ready to roar


I also removed the rusty and dodgy heatshields and replaced them with exhaust wrap instead.

Exhaust wrap on the front pipe running all along the left side.

Airbox, exhaust wrap and Supertrapp.

Engine rebuild


Late September 2008 the work begun to lift out the now quite tired AMF power plant for further care at the Potato speed shop.

Mr Potato is a known Shovelhead friend who not only wrenches the beast, he also races the Shovel on the 1/4 mile distance.


Disassembly was not a happy experience, even though the engine had an overhaul autumn 2005 according to the documentation I got when I bought it. The heads was totally crap and the piston rings were wrong. Only one valve seat was ok, the others were a mess.
Two valves were bent and the rear exhaust valve guide fell out by itself !!!!
But with some appropriate help a new custom valve guide was fabricated and a new big guide hole was milled out so we later could press it in to the head. Only thing that had an ok status was the cylinders and pistons so we kept them.
Even the crank pin rollers had factory specs after 60000km/37000miles so we just replaced the cage.
Potato Speedshop, where Shovels get's TLC and eternal life.

The recipe for my Shovelhead overhaul:
# Compression release valves
# 2” Kibblewhite intake valves.
# Basic porting on the heads.
# A fresh Keihin CV carb with a permanent mounted flange for S&S intake.
# S&S intake ported to match head
# Custom air box with K&N filter and OEM cover.
# Andrews J cam
# Crane cro-moly pushrods
# Jims lifters

And of course all bearings, gaskets and other worn out stuff was replaced.
The heads got glass blasted for a shiny look and the cylinders a nice coat of black paint.

To top it of, the OEM mufflers was replaced by dual Supertrapp slip ons but more about carb and muffler later.


The mighty 1340cc/80" engine rebuild started like this:


Deconstruction in progress


Out with the power and some serious cleaning of the empty middlesection


Mr Potato himself with his magic Shovelhands starting the renewal


New customvalveguide in it's new home


Overhauled head with Mr Potato's special "clearance check, rocker cover"


After I made the porting we gave the head a run in the flow bench.


When the heads was overhauled we also mounted a set of compression rear head.
A friend helped me to machine a hole for the release valve.
We also did an extension for better reach.
It is a tight fit between the sparkplug and the release valve
The other gizmo with the cable is the "cylinder head temperature sensor".
This was apparently original equipment on the old FLT's.

The sensor on the rear head is paired with this gauge in the fairing.
(What the hole next to it is for is a enigma and it's not pretty either.)


Than I did a dynorun again to compare before and after the overhaul.

One of the pull's


Red -> before overhaul vs Blue -> after the overhaul
Not so much difference but nice even curves after.