Bombus Speedshop

Bombus Speedshop
Wrenchin' without supervision since the seventies...

Wednesday, December 12, 2018

Moving up...

OK, so much for my statement a few months back, "I´m gonna race the Stock Class, just some easy RC racing just for relaxation".
:o)
Bought myself a GLR like "everybody else" have.
To bad there´s no other brands who have discovered the growing 1:28 class.

The RWD 1:28 chassi from GL Racing

Monday, December 10, 2018

OSB wall...two of two

Next wall is not only twice as long, it have at least twice as many challenges.
First the cutting around the door.
Next is the pipe from the second floor.
I wanted to cover that pipe, but also have a  hole so i could reach the inspection lid
On top of that I had to struggle with radiator piping.
I made the decision to cover it all.
Mostly because there was not room enough between the pipes and the wall for the OSB board.
Made like a “box” over it all and made a hatch to reach the inspection lid.
Turned out great
Both the pipe from upstairs and the radiator pipes is suddenly gone.

Monday, December 3, 2018

Shelf

The bookshelf or maybe should I say BookChelf because I made it out of chains.
First I made shelves out of wood that I glued and screwed together to a solid piece.
Then I made four big holes in each of the five for the chains.
Marked the holes in the ceiling and mounted “hooks” there for the chains.
I put up the chains and then just slid up each shelf up the chains to desired height and put a bar through each pair of chains.
Easy in theory but really much job, but that's half the fun.

Glued two 150cm/5ft pieces together side by side. Put one bit on each end on the  underside and finally one all the way under.
Repeated this five times and then I had five sturdy, rustic shelves to my own wishes.


I then made four holes in each and put on a layer of semi-transparent gray paint to protect and further emphasize the rustic vibe i'm looking for .


Then I mounted four sturdy mounts in the ceiling and attached chains in them
Cut 6mm metal rods that I put through the chains and let the shelf rest on.
It turned out awesome and was worth the work


Thursday, November 8, 2018

OSB wall...one of two

Speedshop development continues...
The decision to use the machine room as mancave was not really a change for the build.
The machine room should looked the same anyway and that's one of the reasons i changed the plan.
Simple as, it would be to nice as machine room.

First wall to tackle was the wall against the storage.
I bought OSB board and cut them in 40cm/16" strips each, much like wallpaper.
MUCH easier to handle such a strip than a whole boards, especially when there is lots of cutting involved.
The first wall is made of five strips.

 First strip up
Five strips cut, mounted and done

Monday, October 29, 2018

Transmitting

Driving the Mini-Z is as much fun that I've hoped.
But the lack of adjustment on the OEM transmitter  became really apparent, so a another was located.
Found a Kyosho branded KO EX-5 on ebay in the UK for a fair price.
It felt brand new when I opened the box so i'm more than satisfied.
A whole lot of stuff to learn though.
All settings on my old Multiplex  EX-9 was analog, this is all digital on a display.
Quite steep learning curve but the guys at the track are super helpful.
The most important setting for me was the exponential steering and when I found that the car acted more liked I was used to.
The backside was how apparent it became how bad im at piloting a RC car.
So with a great car and radio, the excuses are over and it's up to me.
:)


My dear, dear, now obsolete EX-9 that have been my trusty friend since the nineties.


The new kid on the block, the EX-5.

Blasted

Bought myself a soda blaster.
Many reasons for this purchase, one of them was to remove worn out paint on otherwise OK bodies for the Mini-Z.
Works awesome……..IF you have a air compressor that delivers 10bar/145psi with free flow.
With my tiny compressor I only get about five !! seconds of 7-8bar.
Definitely not good enough, but I got some result tiny so I'm on the right path anyway.
But until my real big air compressor is up and running this have to wait.

The equipment

The SLOW, but really good result.

Mind wondering…

Sometimes I just want to give up, sell EVERYTHING and buy a ping pong table instead.
Order all sports channels on TV and just watch sport and drink beer.

OMG, feeling nausea just thinking about it.
Nah, the Speedshop plans remains even if it feels tough now.


The give up vision


Wednesday, October 24, 2018

Lockie, lockie

The “lock” on the garage door was in need of an upgrade.
I wouldn't been calm even if this lock was on garden shed to be honest.
So my locksmith friend suggested a sturdy mortise lock.
And with some directions from him me and my son began the task to upgrade the lock from the sixties to a more suitable level of security.


The old lock soon retired from +50 years of use


The new, shiny lock in all its glory


Some light woodwork and the new could fit the old hole


The other door needed some more massage to be convinced


But in the end we won.


Friday, October 19, 2018

A to B

Sometimes life's mysterious.
Have been searching for a new A to B car for a while now, but the hours moving the shop and everything around it have made an actual purchase impossible.
But now when things have calmed down a tiny, tiny bit the hunt was real.

So I Decided for a Smart Fortwo.
The Smart car have been a soft spot for me since the late nineties when they arrived.
So I found myself a nice 451 Fortwo two hours from home.
I decided that's the one and went there to see it.
Test drove it and it's a really fun car and I was convinced, BUT I wasn't convinced on THAT car..
It was a really nice car, but the spec wasn't as I have imagined
I also found out that in Sweden most Smart cars only have semi automatic instead of fully automatic.
Automatic gearbox was the main reason for a new car so that was a big disadvantage to say the least.
OK, I didn't had to play around with a clutch, but still...
The VERY basic level also resulted in the lack of power steering.
No biggie really, but the steering was surprisingly hard for such small car.

Some considerations and pro/con thoughts I walked away from that.
But the reason for the trip was a new car and that goal was still on...

A quick look on the classifieds again, was there any other nice car nearby?
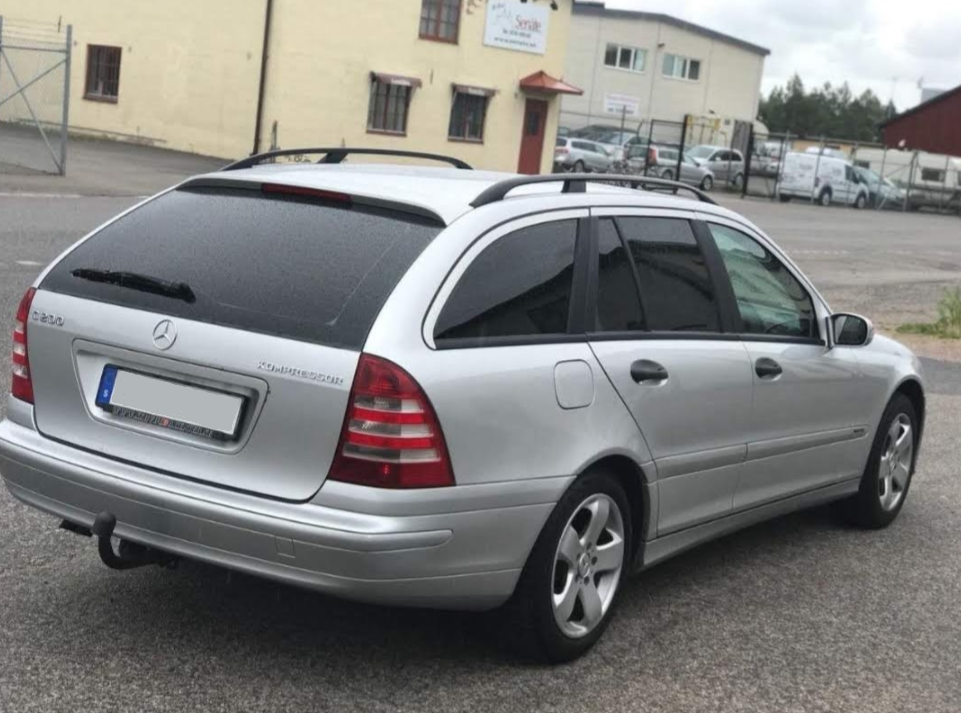
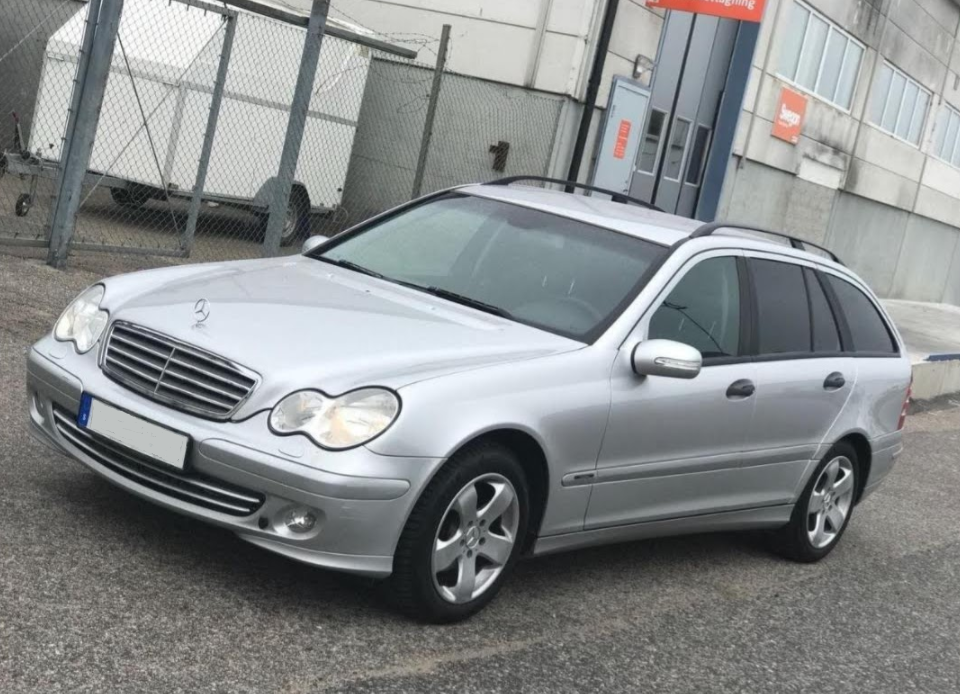
Some browsing later I found a Mercedes W203 I looked at online before.
It was in same town and only 9 minutes away according to Google maps so of we went.
It looked really nice so…...a short test drive and some haggling later I was tastefully cruising home in my first “starcar”.
A 2005, C200 Kompressor and of course automatic.
Really high level of gadgets in the car as well and everything still works!!!

So now I only have to wait for stuff to break.
😀


Tuesday, October 16, 2018

New interior ideas…

Not ready with the Speedshop, not even close and I´m already started to rethink the layout.
A growing thought is that the “Chill Zone” in the Garage and the “Machine Room” switch places.

Why?
Two main reasons:
# The logistics. Not practical to go in to another room every time some drilling or grinding needs to be done.
Better to have the machines near the wrenchin’.
# To nice. The room planned as the machine room will be way too nice for this...dirty...purpose.


And a third
# It's gonna be AWESOME !!
👍
To be continued...

The storage room

A baseline problem is always where to put all stuff.
And there's a LOT...
In the storage room my choice fell on four shelves.
Three regular and one for the corner.
They combined will give me over 20m/65ft of storage in my little room thats only
2x2 m/6,5x6,5 ft.
And still some space to spare.

There is of course plenty of space for shelves in both the garage and the machine room.
But I will minimize the use of shelves there and keep the majority of the stuff in the storage room.
Everything to “automate” the ability to keep everything organized and tidy.
So sick of the constant struggle to have a tidy shop.
If I can start this with base logistics for this purpose i'm glad and with 20m/65ft of shelves in a separate area I have a good start for this.
I will pair the new shelves with a bunch of new storage boxes from IKEA.
The see through kind for easy orientation when trying to find stuff.


About 50 IKEA "Samla" boxes wit lid will be a good cure for my storage problems.

Flooring in da shop

Machine room

First up was the, to be, machine room that got some Laminate flooring.
The plan was to renovate the old wood floor but it had some coating like asphalt or rubber so it just became a smudge with the belt sander when i tried to sand it down..
So plan B was Laminate flooring, actually a better plan.
Became awesome, quite cheap and quick to do.
Forgot to take pic when it was done, but heres the first row down.

First row done


Garage

Here the floor got two layers of epoxy paint.
The plan was one layer but one wasn't enough so I bought more paint and laid down another one.
Really glad I did that second layer because now it looks great.

First layer on the way


Storage room

Another great thing in the new shop is the dedicated storage.
Not huge, but will have place for very much of the “god to have” stuff that otherwise will make a mess in a shop even when organized.
The (dream) plan for the floor here was end grain flooring.
But when I saw how nice it became with the Laminate flooring in the machine room I went for that in the storage as well.
Not only the floor got the treatment.
The walls had some cleaning up of old wiring and after that fresh white paint.
I even put baseboards in there.
First a layer of light gray and then mount them.
The storage is the only room all done at once, thats why I did the baseboards now.

First piece layed down

And done

Also did baseboard in the storage, here some gray paint first

Monday, October 8, 2018

Old...new beginning

After a fifteen year absence from the RC racetrack I´m back on a VERY grassroots level.
looked up the local RC club after the move and they only run Mini-Z but that is just up my alley now.
No full blown 1:8 scale nitro racing as I did during the nineties, this time it's only for recreation.
I just want to have some casual fun occasionally when I get the feeling and some time over and for that purpose the Mini-Z is great.

So I bought a used “stock” chassis, but stock is a strong word here.
It's actually just the electronics thats stock, the rest is all option raceparts from PN Racing.
Low center gravity chassis, aluminum and carbon fiber complete front and rear end, ball diff, full ball bearing set, a transponder and a used Mclaren body included and a custom 3D printed wing and probably some more stuff that haven't realized yet.
Gonna be a really fun, casual hobby thursday evenings.
Dont want more RC at this point, have waaaaay to much with everything in my life just now.
The Speedshop and the big toys in it are still No1 priority and I have no plan to change that.


Bought a “complete kit” with batteries and a OEM radio.


The used Mclaren body included is in a good state but the colorscheme ain't nothing that makes me happy.
I'm thinking of try to mediablast it with soda, a very gentle way to remove eg. paint i've read.
I might buy one and give it a go.

The radio is not that bad actually even if it looks like a toy, the only, and that's a BIG problem it's the lack of adjustments, so another radio feels like a natural step two further up the road.


Monday, September 3, 2018

Beaming up

Next up, a serious beam construction in the hole to keep the structure.

After the very time consuming door hole was done it was time to make the reinforcement to replace the bit of the wall now missing.
My friend Bosse was involved in the beam project from day one.
He helped me buy the beam, cut it to length and weld on “feet” brackets with holes in stainless to mount them to the floor.

The actual job to mount the beams was a quick and straightforward job.
Rise the vertical beams, drill the floor and mount them.
Measure the width at the bottom and cut the top beam same length.
Join all the three and weld them together.
Done

After that i had to fine adjust the squareness a tiny bit with spacers.

And after that i mixed some cement, took a Piping bag from my wifes baking stuff.
Filled it with cement and squeezed it in to all areas between the wall and the beam. It definitely now feels like the garage project got a new beginning this weekend.
Next up flooring in all three rooms and then move all stuff from Speedshop MkI to MkII. 


Bosse doing his stick weld magic


And the other side

Cleaning up

Bashing down a bit of a wall aint something done without a trace afterwards.
Ridiculous amount of dust from the diamond blade and lots of gravel from the rotary hammer going bezerk.
The big chunks ain't no problem except for the weight.
But all the other smaller remains…
I filled up 6 Wheelbarrows with dust and gravel.
I had a big hole in the ground at my property that I filled with all remains with the Wheelbarrow.
The fact that I have a Wheelbarrow with a flat tyre didn't help either.
It became another hard labour for the office desk klerk to drag, yes drag, the Wheelbarrow up the hill where the hole was.

The only thing left now is the big stones that I will take to the local waste recycling centre.


Filled up six of these


One down, five to go.


The big chunks


Big chunks and gravel


The flat tyre


Waaaay up there I took the gravel


The opening


One crucial thing for me is the possibility to go directly from the house in to the shop.
This was also a good thing because on the other side was a bedroom and a closet that I intend to use as machine room and storage and will increase the Speedshop size quite a bit.

So the job begun.
A job that should out to be harder than I ever could imagined.
Before I begun I rented two jack posts and put one of each side of the wall, just to keep the structure intact.

The job started with two drilled pilot holes through the wall and from there I used plumb line on each side to get the square.
Trace a door square after the plumb lines and the top line that I measured from the ceiling.
After that I used a big angle grinder with a diamond blade to cut after these lines.
The disc penetration was about 7 cm (3”)  and the wall was just over 20cm (8”).
So after I cut on either side I was left with a 7 cm (3”) part that I thought before I started was “just” to crack when I gave the wall some beating with a big sledgehammer.
OMG, was I wrong there or what.
It took sooo much more effort than I’ve thought both with sledgehammer and rotary hammer.
First I did a hole on top and thought that now the wall must come down if I beat on it with sledgehammer.
Nope
I made a “T” through and started pounding again and after much pounding I saw some cracks and I could lift off the stones one after the other after continuous beating.


First cut after the lines

Same view from both sides

I´m through

Top bit gone

Middle bit gone

Finaly the sladgehammer could do some good

Bit by bit...

....by bit by bit....

So in the end I was the winner.