Bombus Speedshop

Bombus Speedshop
Wrenchin' without supervision since the seventies...

Tuesday, March 28, 2017

Out in the wild

Finally the little nugget got some sunlight and fresh air.
Rolled it outside to get some real look at it.
And I'm as pleased with it outside as I was inside.
Some minor stuff left like front fender, registration plate holder and kickstand and then deconstruction.
Final welds, some shiny paint on it add a tiny but crucial wire harness and then it's done.


 Left side


Right side


The limited instrument panel


Seat


Rearset


Front wheel


Monday, March 13, 2017

Italjet Dragster, my unicorn

FINALLY I'VE LANDED MY UNICORN!
After almost two decades I've got it !!!!
The 180cc, 19 hp, two-stroke Italjet Dragster.
The coolest scooters of all time,
Hubsteering and spaceframe construction.
All this crowned by the last of the two-stroke generation of big scooter engines.
So now a new chapter opens up at Bombus Speedshop, two-stroke bigblock.
First up bring it back from the neglect done by the previous owner.
Then some basic maintenance like belt, weights and general overall checking.
And then? tuning........?

If this is wrong I don't want to be right.


Controlpanel

One thing​ I've never had before was a instrument cluster.
Not so much a cluster with​ just a tacho, but still.
So first a paper template took form and then transferred to aluminum.
Some cutting, grinding, drilling and letter stamping later I had, in my opinion a super cool dashboard.
The vintage German D Mark coin bought on eBay is from 1967 like my Zündapp.
I also put an ignition lock in the right headlight bracket.
But after this I feel really satisfied with "cockpit" and ignition key installation.

 First a paper template

Then transfer to aluminium

Mounted. D-Mark and warning lights added and text stamped

And finally, the ignition switch in the right headligt bracket

Torque brace

When the definite transition to drumbrake was done a torque brace was needed.
First a temporary template to find angles and hole pattern.
Transfer that to 3mm stainless and voila, a torque brace for the front drum brake converted Kaferacer is Zündapp born.


 Angle and hole positions found with this simple template. 

 Next up designing, more cutting, polishing and mounting but most of all braking. 

The brace done. 
Now just some cosmetic shaping left and maybe some shine. 

Tires

Tires was one of the hardest decisions​.
Amazing how such simple thing can be such hard thing.
In the end the decision fell on the very classic ME77 from Metzler.
I ordered them online and then took them to my friend Lasse at Deep Valley Workshop who mounted them super quick.
Big thanks to Lasse.

 Tires and rims ready to be paired

 The rubber specs

 Make rim strips out of vulcanizing tape

 Lasse at Deep Valley Workshop solved the mounting quick and easy

Finally I had a pair of rubber crowned gems. 

Saturday, March 11, 2017

Seat

Next up, the seat.
When the cuts was done I could measure the seat pan.
First a cardboard template that I transferred to sheetmetal.
Some bending to get the same shape like the cuts and then I drilled 8 !!! holes to mount it.
Eight? Yes, to get a snug fit I used eight.
Then welded nuts on it before I covered it with foam.
First one layer of Sleeping Pad and then one layer of Rebond Foam.
Shaped it to a nice appearance and then off to Paul at Bullit Leather to get it upholstered with black Leather which again was kindly donated by my friend Viking Choppers.
This time I went for a classic "diamond stitch" pattern.
But I also got an idea to challenge Paul a bit, stich the Zündapp logo in the leather.
A challenge he passed easy with the highest grade.
Then home and making a testfit and it turned out awesome.
Upholstery is one of the few things I don't do.
The end result when true craftsmen do their trade are unbeatable.

 Template and some cutting

 Cut, bent and nuts welded

 First layer, Sleping Pad

 Second layer, Rebond Foam

 A sneak peak in the making I got from Paul

 Done and mounted

Will be a nice pair with the "tank cuts"

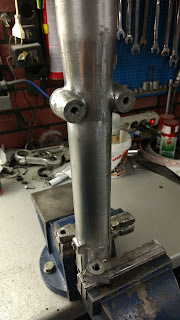
Shaving the leg

First cut is the deepest.
No turning back now.
If the swap from discbrake to drumbrake ain't what I've expected I'm pretty much toast.
A quick butchering with a metal blade in the jigsaw and they were gone.
Then some hard labour with the hand file before sanding and Scotch Brite.

Final question, should I keep them Scotch Brited or do them shiny, time will tell.


 Before

 No turning back now

 Gone !


Challenges in the shop

Technical challenges are most often child's play in Bombus Speedshop.
But sometimes true problems​ occurs.
One crucial area in a shop is the coffe as you all know.
One day I was runnin'low.
Not totally out thank God, but low.
Had some left down in the bottom but it was out of reach.

 Hmmm, some left down there

 What to do

 Spoon and knife


Some cutting and adding of hi tech construction tape made 
Bombus Speedshop again a harmonic place with nice coffee smell. 

Wednesday, March 8, 2017

Rear light

Had an idea for the taillight in my head for many years.
To use one of my old pistons that classifies as a sacrifice to the gods of speed.
Don't remember which mishap this is from.
Can be from my breakdown in Germany when visiting the friends in Zündapp Zweitakt-Team Probstei or in the deep woods of Dalsland here in Sweden.

On the German breakdown I was rescued by the whole gang. I was their guest, so I could just watched them replaced my cylinder and piston for great used set that I bought for a real bargain price from them.

On the Dalsland endeavor I was rescued by my dear friend Jacob R.I.P. who picked me up in his Chevy Impala and gave me a case of beer to calm down before we got a van to save the broken hero from the ditch in the forrest and to a safe garage.
That time I waited until I came home to fix the remains.
Instead that weekend I rode the crash van with my friend Bert helping other Zündapp brothers in need.

Which occasion this piston is from will probably never have an answered.
But anyway, both breakdowns shoved real friendship on on a high and real heartwarming level.

But a nasty breakdown it was for sure

First up, make a hole with my lathe.

Next up mount and test the rear LED light assembly.
My Zündapp is a 1967 so here in Sweden the requirement is just rear light, no stoplight needed.

The final touch is the license plate lights in the boost ports. 


I put two white LED's in the boost ports and suddenly I had not just a legal rear light, I also had a super cool one of a kind one with some personal history.

Next up is to build a bracket for the licenceplate and rear light.
Its gonna be a sidemounted unit.
First reason for this: There is no space for it up on the cuts.
Second reason: It looks so much cooler with sidemounted licenceplate.

But more about that later...