Bombus Speedshop

Bombus Speedshop
Wrenchin' without supervision since the seventies...

Thursday, December 15, 2016

Rearset

A must have on a cafe racer is of course rearsets.
My choice is the Swedish classic from Raask.


Raask parts was mandatory on Swedish cafe builds in the seventies.
They made Rear sets, Clip-ons and headlight brackets back then and still do.
I bought all three but the headlight brackets was a bit worse quality then expected.
The rear sets and Clip-ons are not top quality either but the cult value compensate for that.

I mounted them in the swingarm OEM passenger peg holes.
Just drilled out the M10 threads and put a M10 from the inside and in to the peg.

Next up was the rods.
Used a bit of rebar I had laying in the shop since the bagger build.
Cut the piece in half, drilled and made M6 threads in all four ends in my lathe.
On the gear side I used both OEM ball joints from the Raask kit.
Brake side needed both more thinking and more work.
Ball joint in one end and a piece M6 threaded rod in the other.
The threaded rod is to make the rear bit a direct bolt on to the OEM Zündapp brake arm.

Both rods ready for test fit. 

Gear side

Brake side

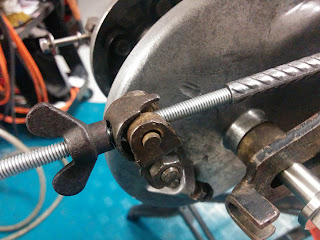
Detail of the rear brake rod with the old unrestored hardware

Tuesday, December 13, 2016

Recreation activities abroad


Life ain't just speedshop time for Bombus.
Some inspiration and other types of fun than fabrication is a must now and then.

Fairs are the single most fun and inspirational to do for a laugh seeking gearhead like me.
This time the trip went to Germany for the Custombike Show in Bad Salzuflen.
"The worlds largest exhibition for modified motorcycles" and big it was.


Not only that, we also got to catch up with two great friends, NPJ Design and iammrpartridge.So awesome to see these great guys again.
NPJ Design we didn't just met we also hang out in his awesome booth and the super cool Kriedler bikes. The want is strong these bikes!

Some random pics from the weekend.
There was a live "biker build off" at the fair, Germany vs France.
No shocker that the German bike won.
But this is the awesome French bike by EMD

Billet parts for the EMD bike waiting for assembly

And I put my mark on the EMD build

Our hotel the Kurpark-Hotel

A BIG guy 

Amazing café bikes from Mellow motorcycles

Environmental friendly build

Cool Ironhead café build

The official Custombike party

Harley custom

UCC´s amazing BMW build

More or less dressed chicks all over the fair

There was no shortage of extreme Harley builds 

A cool build in the LOUIS booth

We had the best weather

 A supercustom and probably superexpensive open belt trans for Sportster from NHPower

 NPJ Design´s AWESOME booth with the supercool Kriedler bikes.

NPJ Design´s new build. Cant wait to see how cool this gonna turn out.

Monday, December 12, 2016

Headcups

An update of the headcups was necessary.
Made them really quick about fifteen years ago when I built the Zündapp.
Borrowed a friend's lathe at his work one night.
Back then I sucked even more than today when it came to using a lathe.
But function wise they turned out really good and have served it's purpose well over the years.
This winter with the whole rebuild they needed some TLC as well.

The old version


The updated and smooth version


Welded back with a little wider stop so the triple tree don't hit the tank anymore. 
I also removed the steering lock because it doesn't fill any purpose anymore with the KS125 forks.

Sunday, December 11, 2016

Getting jiggy with it

Delay in da shop.
Needed a jig for the Zündapp build.
Some brainstorming and once again my trusty +20 year old Black & Decker workbench came useful. A piece of metal in bottom of the frame fixated in the bench wise and two straps was the solution.
Now It's in a better height and the workbench and wise is free to use for fabrication again.
Moving around is also possible now unlike when I had it in the workbench wise.


Monday, November 21, 2016

PartZ

First batch with Zündapp goodies except for the already arrived spokes.
This time just quite boring replacement parts.
So to spice up things I took the expensive choice and went for the stainless steel alternative.
Axles and chain tensioners are in this premium choice.
The rest are hollow axle, swing bushings and rubber for the elastic sprocket mount.
I also went for the red NGK spark plug cap/wire.
Also planning to upgrade the ignition/charging system from 6 to 12V and besides that a red "Racing Cable" maybe makes things a little more spicy?


Sunday, November 20, 2016

Fan...

Not used at all of this. 
But actually really nice to meet a fan.

Me and the fan 

Friday, November 18, 2016

Smooth Rollin'

Both hubs was in desperate need of new bearings.
Rear because they were just old and rusty.
The OEM Zündapp/Marzocchi front axle have larger diameter than the donor bike so the old bearings had to go there as well.

For the rear I bought SKF local of the shelf.
But in the front I had to go abroad because of the odd bearing size needed.
I found a OEM Suzuki bearing from Koyo in the UK with the new specs needed for the conversion.


To remove the old bearings I just welded a nut to the old bearing and used a slide hammer and out they came.

In the rear it was just a replacement job.
But in the front I also had to machine the center spacer between the bearings from 15mm to 17mm.
And after that it was a straight forward job even in the front.


Next up was the spacer.


I machined the old OEM Zündapp brass spacer to the new measurements and suddenly I had a Yamaha brake hub in a Zündapp/Marzocchi fork.


Next up, fork deconstruction to give the triple tree and legs some massage and shine....


Monday, November 14, 2016

Beefing up the Zündapp frame

Another frame mod that I actually did four years ago was to beef up the swingarm pivot point.
The change is to the new type from the newer Zündapp model.
The swingarm axle diameter is increased from 10 to 14mm.
I have a friend who did this way back so I was keen to try it myself on my ride.
Have no idea how he did but this is how I did it.

This was now possible because I just bought the TIG welder at the time.
So a newer Zündapp "529" frame was bought and butchered up and my older Zündapp "517" frame was cut to accept that piece.
But before any cutting on the old frame could be done a fixture was fabricated to maintain everything straight and on the same position.
When the fixture was made I just had to cut it and increase the swingarm mounting hole from 10 to 14mm and slide the beefy part into place and secure it to the fixture before the TIG was fired up.

Fixture done and the "517" frame ready for cut.

Old "517" frame cut and trimmed to accept the new "529" frame part.

The new "529" swingarm mount testfitted.

The new "529" piece part of the old "517 frame.

Here is the lower M10 fixation point enlarged with the beefier M14 rod.
Just some nice welds and the job is done


Straightening the Zündapp frame

When i´m now rebuilding my old friend the frame needed some love and affection.
First up, straighten it.
The frame had been involved in some serious wall hitting or something similar in the past and this had to be reversed.
The weapon of choice was brute force and fire, an ancient combo that have been successful since day one.

The before shot

The torch was lit and with some heat on strategic spots in combination with me pulling it in the right directions the work was done.
Straight as a ruler? Nah. But definitely good enough.

Mayhem to be made

Monday, November 7, 2016

New wheels for the Zündapp

This will probably be a series of posts about the creating these wheels.
One of my most neglected vehicles for sure is the Zündapp.
My beloved lightweight bike.
A regular 30 km/h moped converted and registered as a motorcycle back in 2003.
Upgraded from original 1hp, 3 speed & 50cc  to 70cc, 5 speed engine, KS125 fork to name a few, but since then just minor focus in the shop.
But in my head and heart the Zündapp have always been number one.
I have even tattooed the Zündapp logo on my shoulder.
#dedication

The goal have always been a bit away from the original look but still with Zündapp parts.
But for the past time it have been more focus to make a caféracer of it.
Over the years I have gathered parts for this build so many things are already on the shelf in the shop ready for next step.

The first thing to take the next step are the wheels.
Hubs was already arranged, the small OEM Zündapp hub in the rear and a big Yamaha drum with unknown origin in the front.

Hub size comparison, OEM hub vs the new Yamaha drum


Rims and spokes was something that I didn't had so a set of 18"x1,85" Borrani Record replicas was bought from Italy and the hunt for spokes begun.

Something like this will it turn out.

To find spokes is no big deal, but in what length? That's the real head scratcher.
First a mock-up with a set of old Zündapp spokes.
In the front the length was enough to make a measurement but in the rear I had to come up with something else to measure.
So I had to raid my kids old party equipment to get some straw's to extend the spokes and voilà I had the rear lengths as well.

Mock up with the straws

Next up:
# Order spokes and nipples
# Mock up the front drum on the bike
# Lace the wheels
# Buy and mount tires and put on the bike

To be continued...

Multiple focus

Not just the Speedster will have attention this winter.
The ugly duckling of Bombus Speedshop, the Zündapp will also have some love.
I have a old dream to made it more of a café racer.
I have gathered parts for this reason over the years and finally this journey have started.
First up, new wire wheels instead of the mag wheels I have now.
This will also give me a nice big drum brake in the front instead the great, but not so nice looking disc brake I have now.


Old pic of my partner in crime for almost 20 years.


Wednesday, October 12, 2016

Side bag

To keep the adrenaline on a healthy level when ridin´ I have filled up the side bag with some goodies.
Just so I know that if the little bike wants to give me some attitude I can fight back.
Tool roll, puncture spray, 1 liter fuel, box with nuts n´bolts, mechanic gloves, zip ties, a fresh towel and a padlock.
A good baseline for taking care of roadside mishaps....IF they occur.
But so far it have been a smooth ride but you never know when vehicle puberty kicks in and make your life a hassle.

The side bag ingredients

The bag itself is a old OEM Harley bag that I bought on a swapmeet some years ago.
It was in a really bad shape, disgusting areas with mold, hard as wood and some missing seams.
But a thorough cleanup and LOTS of leather grease took it back to life again.
The missing seams i replaced and after some time I had a really nice side bag.

The side bag itself

Monday, October 10, 2016

Aftermath

That's season 2016 for ya all !
The numbers are 1729km/1074 miles from 18 July to 1 October.
Some say it's much, some say it's little.
I'm very satisfied and just say, that's what it became this season.
It ran like a dream all the way with no major issues and gave a healthy 65Hp on the back wheel.
Went to Thomas at Tekmo to get some hard facts on the bikes power.

Couldn't really ask for more.
Sure, it's a bit harsh on bumpy roads but that comes with the territory with a rigid frame.

Start 2016

End 2016


Thomas on the dyno

The hard facts. Nice curves and good power output.


After the dynoday it was pretty much over for the season so here the Speedster have the tire outside for the last time 2016. 


So, finally airborne !
Next step is to give the little bike some wrenchlovin' so I had to get the wheels off the ground.
Solitude often dominates the Speedshop so clever ways to handle things alone must be created.
The method to get the little beast on the lift today was step by step by step......


So now the hard decisions what I want to accomplish this winter have to be made.
The downside with the fact that the bike became so awesome is that the urge to "update" is quite low.
And the "updates" already planned for this season are neither cheap, quick or easy so first I have to come up with a decision.
But I have some time left, I still want to tear down the top end and the cam side to maybe get some answers why I had such good numbers on the dyno.
I also want to give it a gasket overhaul just in case.
So, here I will start this season.