Bombus Speedshop

Bombus Speedshop
Wrenchin' without supervision since the seventies...

Saturday, December 26, 2015

Steering damper

Years ago I bought a used Öhlins steering damper and initial thought was to put it on the Shovelbagger. But it had quite weird dimensions so it continued it's life hanging on the wall in the speedshop.
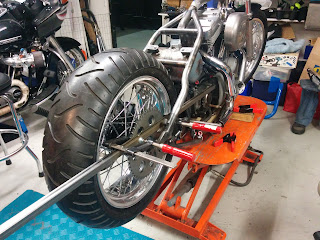
So the other day I tried it on Cosmic Dreamer and this time I had a match.
But to avoid flimsy screw-on brackets I made a real weld on bracket instead.

The steering damper before it found a new home on the Cosmic Dreamer. 

First cut bit of my old trusty friend Mr square tubing. 

Then add a bit of extra metal on the inside to make enough thread. 

Positioning and testfit with a hose clamp.

And tacked in to place ready for final weld when I take the bike completely apart soon. 

Tuesday, December 15, 2015

Top engine mount

Time to finally fabricate a top engine mount.
I want a quite long mount to spread the stress over a longer area.

First a cardboard template. 


Then trace the template to 5mm - 3/16" steel and some rough cutting.


And YES I'm environment friendly and use as much as I can of the cutting discs. *Hehe*

I also made a weld on a spacer to get it in the center of the frame, then I drilled the mounting holes


Testfit on the bike and now some tackwelds and next time the engine comes out I can make the final weld to the frame.

Saturday, December 12, 2015

More spacing

When alignment with the complete wheel was tested there was not enough spacing between tire and chain.
No biggie, just flip the front sprocket and about 0.2953"/7,5mm more is available, just use a thicker spacer between hub and sprocket.
To measure up the alignment I used a long square tube.

Sunday, December 6, 2015

Spacing

So the weekend came again and then it was business as usual in the speedshop.
One of the things I fiddled with this weekend was to get the rear wheel spacing just right.
Not so easy as it sounds. Not just the spacers for the hub will have attention but also the sprocket and brakedisc spacing.
My friend Viking Cycles had a spare rear hub I could use to ease up the work.
And he also arrived when it was time to measure up the alignment of the sprocket.
With a long ruler and many hard words to each other we finally came to a verdict.
*Hehe*
Also the brakedisc spacing issue was later solved.
Now some final spacers for the sprocket and a touch with the lathe on the brake side spacer will do the trick.
My dog Kurt supervised today's work in the speedshop as usual.


Project thoughts

Mind wonder when projects develops.....
I have quite a good pace in the speedshop but with all my plans there will take way to much time to get it on the road.
Thought's about getting it road ready first and do upgrades winters to come instead.
So first it will be without turbo and with the trusty CV carb and the plan is to just get a registration and get some miles before the project continues.
Just to get a registration is a huge journey anyway with at least two technical inspections first.
One soon, early 2016?  where the main construction, welds, solutions, materials eg. are checked on a non functional bike.
And then when the bike is ready with all fuel, electrics, seat... yes everything, then it´s time for final inspection.
When that's OK there there is just the registration inspection left and after that you have a vehicle you built yourself.

Saturday, December 5, 2015

Wheelies

Finally I had some build time of so I could do some wheelie training.
Naah, just needed a better angle to do some more spotwelds on the kickstand mount.
How it went....? Not my best welding accomplishments in the speedshop to be honest, but it was worth a try anyway.

Saturday, November 28, 2015

Mockup

Time to finaly get the girliebike on its own feet.
Must say it looks awesome.
The enthusiasm dip i had earlier this autumn is long gone now.
This gonna be good for real !!!


Wheels

So the wheels came back from the rubber man.
Looks awesome, 17" & 21" was a wise choice.
Time for some real mockup now....?


Monday, November 23, 2015

Monday, November 16, 2015

More pipes

So the pipework continues.
I left the idea with thick wall piping...for now.
This time I'm cutting up OEM Harley pipes instead.
The other big job with the pipes except positioning the turbos is to step them down from 1 3/4" to 1", what that the turbos have as inlet.
Did some calculation and came up with I have to shrink the circumference from 139,5mm to 79,8 mm.
To manage that I did 8 triangular slots 7,5 mm wide at the top.
This is just a measuring prototype and the final pipes must have some more massage first for the right angles out of the heads to position the turbos.
Buts that's another post......
The 1 3/4" pipe i started with.

The 1 3/4" pipe with slots.

The stepped down end ready for weld.

And the finished testpiece next to the flange.

Think I´m on the right track here, but I have not abandoned the idea with more rigid thick wall piping.
Time will tell wich alternative will walk away as the winner.

Sunday, November 1, 2015

First cut...

The first header pipe cutting exercise just happened.
Number one of MANY before the little snails are mounted for real.
This test fit felt wrong before I even started to weld.
But what the heck, I must start somewhere to make this to the Cosmic Dreamer it will be in the end.
The first, way to snug test fit.

Wednesday, October 28, 2015

The christening

Any project should have a working name and so does mine......from now on.
Hereby I baptise you to Cosmic Dreamer, or CD for short.
Cosmic Dreamer, a suitable name for a build like this.
A girlie bike with out there, dreamy specs, use and time frame.  *Hehe*

Cosmic Dreamer

Sunday, October 25, 2015

Note to self.... Sportster front hubs SUCK!

I have now laced three front Sportster front hubs.
The first, LAST & ONLY.
A Wideglide/rear hub is a walk in the park compared to this.
But now its finally laced and truing is up next.
Truing that I normally dread will be like meeting an old friend compared to lacing.

First I gave the brand new Morad rim a quick polish with the machine and then by hand. 

Then some protective tape to save the delicate, shiny rim. 

And then the madness begun...... There was times when I was very near a breakdown but finally I walked away as the winner. 

Sunday, October 18, 2015

Rear wheel

So the transformation from a fancy pile of stuff to a wheel begun.

Step one, the parts:
# The now refurbished rear OEM HD hub with new bearings and shiny black powder coat
# A shiny Akront rim
# A set of new chrome spokes


Step two, lacing: Basicly to get everything in to place


And a while later a laced wheel was a reality


Step three, truing: Yours truly halfway ready truing and almost ready for a mental institution


Step four, completion: But after lots of anger, adrenaline and instant coffee the wheel was both round and straight


Straight like ruler in the frame


Now the tire must be a part of the setup so the rest of the mockup can continue.

Sunday, October 11, 2015

Blackout

Finally the decision fell in the issue with the hubs.
A nice layer of black powdercoat became the final touch.
Now I'm gonna lace them it to a used Akront 17"x 5,0" rear rim and a new Morad 21"x 2,5" front rim.
But first some new fresh bearings will find their new home in the hubs.


Handle the bar....

So the handlebar issue was up on the Sportster build. I'm using Buell handcontrols and they are for 7/8" handlebar and the Harley risers I'm using is of course 1". To solve this I bought one of those new hip "fat bars" and they are 1-1/8".
So the very labour intensive job to take up the 1" Harley risers to 1-1/8" begun and for this I used a adjustable hand reamer I borrowed from my nice garage neighbor Bo.
As I mentioned, a very labour intensive job but some hours and a gallon of sweat later I had a perfect fit and it looked awesome.
In the making...

The perfect fit

Rear rim

This winter the Sportster project will have most focus in the speedshop.
Last year I bought a old used 17" Akront rim instead of the 16" I started with. It was in ok condition but needed some TLC to take the shine back to its former glory. First with machine polish and then some fine polish by hand and now it looks like new again.
Aluminum is a awesome material, if you are willing to put in the hours you are always rewarded with the unbeatable alu shine no matter what state the parts was in before.
The rear rim spec's

The restored glory

Thursday, October 1, 2015

End Of Season Run...

So the 2015 season is coming to an end.
There was time for "End Of Season Run" this past weekend.
I met up with all the +300 others but I took a pass on the run.
But decided to make a nice one man run in the crispy, sunny autumn air.
I got a amazing day in the saddle so now I have enough energy to last all the loooooong winter here in Sweden.
Let the darkness and instant coffee come!
(Yep, next year I MUST have both headlights on. Stupid (previous?) law here in Sweden not allowing two lights on a bike.)


Photo: Camilla Moström

Wednesday, September 23, 2015

High vs low tech

Circumstances made that I ended up with a magneto Ignition in the Speedshop.
So, the question is now, should I use it?
The thought of use the whole scale of technology is fun. Electronic fuel injection AND magneto Ignition.
Talk about each end of the scale.

And of course when Bombus Speedshop is involved there MUST be modifications of perfectly good parts. And this time the magneto must be rotated 90 degrees to fit "inside" the exhaust loop.

Monday, July 20, 2015

Hubby days

Bought a rear hub for the Sportster project a while back and when I came home from vacation it had arrived.
It was in a quite shabby state to be honest but that was expected.
I put in my lathe and gave it a treatment and soon it had its former glory back.
Now the final question is if I should powdercoat the hubs black or if I keep them as they are.
Time will tell...

The shabby hub that arrived


Finish in the making

And the not so shabby result


Tuesday, June 30, 2015

The other HD...

My other project I have is a custom Sportster build.
This project is over a decade old but it got my attention again when I finally got my hands on an engine.
But just as the project re-started it had to stand back again last winter when the Megasquirt EFI conversion of the shovelhead suddenly started.
But this year it's just small upgrades in pipeline for the shovelbagger so from now on the girlybike will have the attention it deserves.
This bike is basicly just a tiny frame and and a Sportster engine.
But why a tiny girlybike for a 300 lbs, 6' 3" guy?
Why not? If it is reasonable there is no future for a project in Bombus Speedshop.

I think this is a good base for a never ending project.
This bike is way to small for me but will be a nice complement to my big bagger.
The plan is wild and will have a high tech level.
Way to high for a build like this, but that's half the fun.
Think A to B Hot Rod is a good description. "built to handle nothing".
To much is the key to long projects, and long projects is the ones I likes best.
In the end this small gem will have both Megasquirt EFI and turbos. Yep, plural.

Saturday, June 20, 2015

Logging

As I mentioned earlier I can log the EFI system with a PC and not just standing still.
I can also "autotune" while driving.
Not so challenging task in a car but on a bike there's another matter.
I made a mount on the tank where I mount my PC, a 10" mini laptop.
The mount is made with a special Velcro® and have three mounting points.
Started with two but I added another for more rigidity after a while.
It's just a 10" laptop, but there is still a challenge but that's a part of the thrill.
I started with a "regular" laptop but that one decided to crash just before the first start.
This resulted in the project went to full blown computer project due to the fact that all EFI files was on that computer. So I had to shift focus and try to get those files out.
I had success with the file rescue and a search for another laptop begun.
The first one was kindly donated by my friend Wiking Cycles and he rescued me again with the mini laptop I have now.


Friday, June 19, 2015

Second start

The first start made my adrenaline flow so extreme so I completely forgot about logging the EFI system.
The next day it was time for another try, this time with adrenaline at more normal level.
By judging of the massive smoke it was a bit left until I could hit the road.
This solid cloud was the result of about just a minute of idling.
But this time I got a log so facts could been seen and relevant changes made.


Bling

Some bling was required when the EFI made the mighty old shovel roar again.
Ladies and gentlemen, the Bombus Speedshop point cover.


First start

So finally the D day was up!
(Actually a while ago, in middle of April.)
I was so stressed so there was no thoughts whatsoever to film this moment.
But all thanks to my wingman Feeler Cycles this super stressed and confusing moment went in to eternity.
This moment is definitely on my top 10 adrenaline list.
But even if the engine went rough to say the least this first time my smile in the end say's it all.


Friday, May 22, 2015

System test

After all sensors was mounted and the throttlebody was done and tested, it was time for a live system test. For this the system was rigged with a temporary harness.
Not all components could be tested eg. the injectors.
But the harness and calibration of temps, pressure and TPS was done.
Nothing of all this would be possible without my awesome buddy Olaf.
Thanks again Olaf! He is one of the very few that have backed me through this project.
Most others have been quite negative about the whole project so having guys like Olaf have been crucial to keep the spirit through the process.

Olaf in full action with the computer. 
(Same computer that decided to crash the same day the fist engine start was up)

First test of the system with Tuner Studio. 

Saturday, April 25, 2015

TPS vs Tecalemit Jackson throttle body

When brackets and all adaptation was done to the vintage Tecalemit Jackson throttle body I had to do some testing of the complete unit and it looked like this.
The vintage TJ throttlebody was now brought in to the new century !!


Shine

When the brackets for the throttbody was done I thought they deserved some shine and rust protection. Some Zinc plating gave the final touch.

Shiny brackets worthy a throttlebody 

Throttle arrangement

To have a hardware adjusted idle and a good enough return spring something had to be made.
I took the return spring from a Buell throttlebody I had in the shop. But first I made a nylon bushing for the spring and shaft and then a bracket to hold the idle screw and stop screw for throttle travel.
Many templates of both cardboard and Pepsi can was made before I started with the real pieces. But soon enough I had some pieces I was satisfied with so I just welded them with the TIG. Drill holes, tap and some screws, some grinding and I had a throttle arrangement.

Buell return spring and home made bushing

Template time for the bracket

Bracket in the works

Welded and ready for some cosmetic grinding
( Yes, I was LOW on gas that day)

Final bracket